
Demystifying Cluster Stitches Part 1
- Stephanie Davies
- Oct 23, 2012
- 5 min read

Hi there! I hope you’ve all had a wonderful week! Mine hasn’t been too great. I ended up going to the doctor with Eliana, turns out she had an ear infection but luckily she is feeling much better now. Just in time for myself and the hubby to get sick on the weekend. I woke up with a sore throat on Saturday and it got progressively worse towards the evening, which sucked because we were invited to a lovely lunch party. We ended up leaving early because I felt so ill 🙁
I am feeling much better today though. I did almost nothing on Sunday, that obviously helped 🙂
Now for today’s tutorial. Last week I posted a tutorial on the popcorn stitch and I received a few inquiries about the differences between that and the puff stitch. After doing some research I decided that I would give you a comparative tutorial on a few different cluster stitches to show you how they are done and the differences between the stitches.
Why are they called cluster stitches? Very simply, because you are creating a little cluster by inserting the hook into the same stitch a number of times to create the stitch and then finish the stitch off by pulling the yarn through all the loops that are on the stitch. Cluster stitches are great for creating texture in a work. They are also wonderful for baby projects because they are very tactile. Cluster stitches are always worked on the right side (except for the puff stitch) and are therefore really well suited to working in the round.
Now, without further ado, here they are:
First up the Puff Stitch
This is probably the simplest cluster stitch. I’ve actually shown how to create the stitch in my Tunisian Flower Bracelet tutorial. Traditionally the puff stitch is used in conjunction with HDC or DC stitches, so you will need to CH2 or CH3 at the beginning of the row. For the purposes of this tutorial I am only showing you how to create the actual stitch. You can make the puff stitch as long as you like ( I’ll post a photo of a scarf I made using a very long puff stitch at the end).
Step 1
YO

Step 2
Insert hook into next stitch, YO and pull loop through stitch (3 loops on hook)

Step 3
Pull the last loop up so that it is the same hight as the DC.

Repeat step 2 and step 3 four more times (11 loops on hook).

To finish the stitch off: YO and pull the yarn through all the loops on the hook, secure with SS.

This is quite a delicate stitch as it only consists of long loops of yarn which aren’t held in place by anything except the final slip stitch.
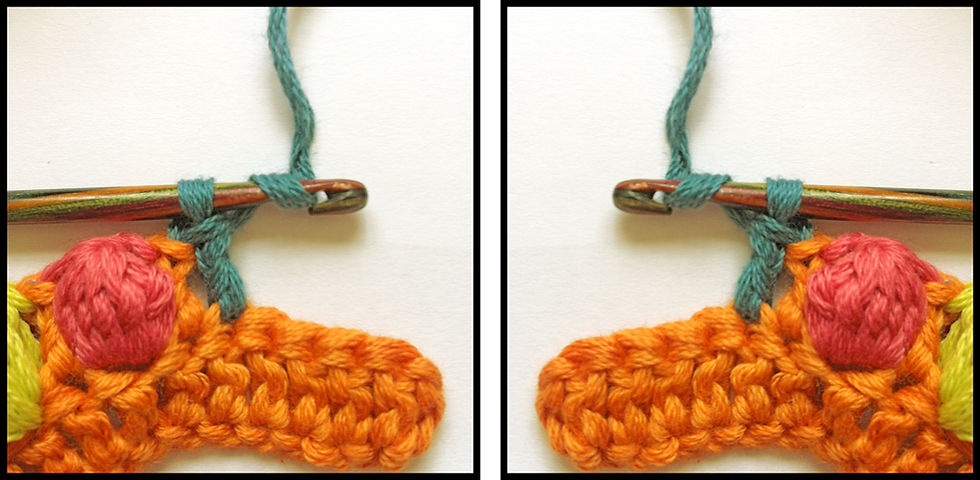
The Bobble Stitch
This stitch is sometimes also called a puff stitch but it differs from the above stitch in that you partially finish off each of the individual loops as described below.
Step 1 YO, insert hook into next stitch, YO and pull loop through stitch (3 loops on hook).

Step 2
YO and pull yarn through 2 loops on hook (You are left with 2 loops on hook).

Repeat step 1 and step 2 four more times ( 6 loops on hook).

To finish the stitch off: YO and pull yarn through all the loops on the hook, secure with SS.

Originally I was only going to compare the popcorn stitch to the puff and bobble stitches but I found the following stitch on Pinterest (I’ve pinned it onto my Crochet Stitches board) and thought it was really interesting, so I’ve included it here.
The Offset Puff Stitch or Pineapple Stitch
Step 1
DC into next stitch

Step 2
YO
Step 3
Work around the post of the DC you just made by inserting the hook between the last two posts, from the front to the back, YO and pull the loop to the front of the post (3 loops on hook).

Step 4
YO and pull the yarn through two loops on the hook (2 loops on hook).

Repeat step 2 to step 4 four more times (6 loops on hook).

To finish the stitch off: YO and pull yarn through all loops on hook, secure with SS.
Here is a photo that shows all completed stitches next to each other, you can click on the photo for a larger view.

Note how each stitch puffs out slightly. The popcorn stitch pops out at the top, due to the fact that the working loop is inserted through the first loop of the cluster to complete the stitch. The puff stitch creates a lovely simple puff which would be wonderful to use on soft baby projects. The bobble stitch is somewhat more structured than the puff stitch and more secure, which makes it more long lasting than the puff stitch. The offset puff or pineapple stitch creates a lovely pattern and is the least puffy of the stitches I have chosen to show you.
Here’s the scarf I made with an extended puff stitch, it creates an almost feather boa-like effect. I used a credit card to make all the loops the same length (similar to using a broomstick needle for broomstick lace).
I found some lovely patterns and tutorials using popcorn, puff and bobble stitches. I couldn’t find anything for the offset puff stitch 🙁 I think I’ll have to come up with something myself. If you click on the photo it will take you to the link.
This pretty Granny Square makes use of the popcorn stitch(only 3 DCs in each cluster, not 5 like in my tutorial).

Here’s another popcorn stitch flower, this time in hexagon form. It’s from Colour in a Simple Life’s blog and she calls it a bobble stitch but if you look at the tutorial it is actually a popcorn stitch.

I couldn’t find a pattern for this puff stitch circular motif but I think one could easily adapt a simple doily that makes use of HDCs or DCs in order to create something similar.

This puff stitch hat is lovely.
Here’s another hat. I love the fact that the puff stitches are a different colour, and it’s a slouch hat ***LOVE***

Next, this gorgeous granny bobble stripes scarf, which could easily be modified into a blanket. I just love the colours!

I can’t make out whether this blanket is made with popcorn or bobble stitch but it’s absolutely fabulous! The pattern is for sale on Etsy. I also love the fact that it’s a floral blanket that was made for a baby boy, who says boys and flowers don’t go together.

This gorgeous coin purse shows the bobble stitch off to full effect. Unfortunately this is not a free pattern but the £ 1.50 would be well worth it since it comes with a chart and diagram!

Please don’t forget to send me photos of your creations, whether it’s my overlay heart, or Tunisian flower bracelet or something you have created using some of the stitches I have shown you, or even something that you are really proud of and think I might like. You can email me at stephanie@abagfullofcrochet.co.za Or if you’re on Instagram you can tag the photo #loveabagofcrochet and @stephaniedavies You can also post on my Facebook page, if you like.
Oh, and don’t forget to find me on Pinterest. I have started to categorise my crochet board and have split it up into eight separate boards ranging from decorations and toys, to wearables, blankes and afghans, stitches, motifs, etc. I had over 1200 pins on my crochet board and I couldn’t find anything any more this is much easier and makes more sense.
Next week is all about increases, decreases, shell stitches and ‘together’ stitches.


Comments