
Overlay Crochet Heart
- Stephanie Davies
- Sep 18, 2012
- 5 min read

Updated: Dec 17, 2020
I love designing patterns, although having a little ten month old person trying to grab the yarn and crochet hook from me while I’m working can cause a bit of frustration sometimes, but then she’s always so pleased with herself when she grabs the yarn that it’s actually quite cute <3
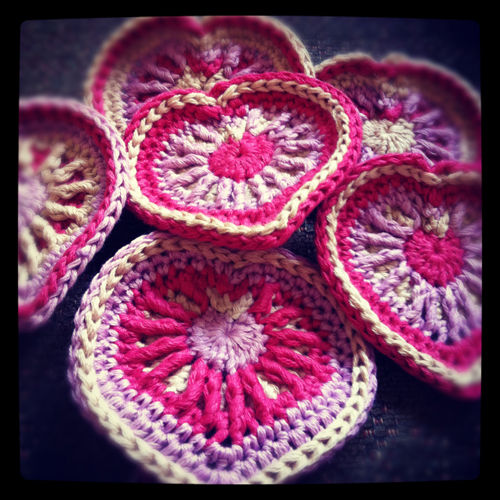
We’re invited to a wedding at the beginning of October and I thought of making something instead of buying. It has to be small since the couple will be moving to Canada and so can’t take anything big with them. I saw some lovely granny square hearts on Pinterest a little while ago and thought, ‘why not a heart garland?’ As much as I love all things granny square though, I wanted something a bit more contemporary. I had been looking for an excuse to try some overlay crochet and thought a heart garland would be the perfect item to try it with. I had an idea in my head and just started fiddling with hook and yarn. I can’t write a pattern and then try it out, I have to see what I’m making in order to decide whether I like it or not. I made one heart but didn’t like the way the colour changes looked and tweaked it twice before I was finally happy with the result.
Ok, so, without much more ado here is the tutorial for the heart. I prefer diagrams so I have added one but you will have to read through the instructions and look at the photos in order to understand the finer aspects of this design.
Have fun and feel free to ask if you have any questions or get stuck.
Overlay Crochet Heart Tutorial
Firstly I recommend having a quick look at my Stitch Index, just so you know what’s going on.
Little bits of leftover yarn are perfect for this project.
I used Vinnis Colour Nikkim Yarn. It’s a DK so I used a 4mm hook.
You can use any yarn you like though, just remember that thinner yarn will yield smaller hearts and thicker yarn will yield larger hearts.
Try to keep your tension as even as possible, especially when it comes to the FPTCs.
ROUND 1
Begin with a magic ring.

CH 2, 6 DC, 1 HTC and 6 DC, CH 2 and SS into the magic ring to finish off the center heart.
At this point you want to tighten the magic ring but keep the SS quite loose because you’re going to start and finish the next round by going into that stitch.
13 ST in total

ROUND 2
Change colour

CH 3, * 2 DC into ST, repeat five times **, 1 DC into the next ST. (So far you should have 11 ST. This is the right side of the heart – or for the right handed people- the left side) 1 DC, 1 HTC and 1 DC into the next ST (this is the point of the heart), 1 DC into the next ST, and repeat from * to **. Finish the row with CH 3 and a SS through the SS from ROUND 1, which you can now pull tight. Keep the new SS loose enough to get the hook through at the end of the round.
25 ST in total

ROUND 3
Change colour CH 2, 1 SC, 1 FPTC (Front Post Treble Crochet), 1 SC, repeat six times with the first FPTC going around the first CH 3 of ROUND 1 – at this point you should have 18 ST.

1 FPTC, 1 HDC, 1 FPTC (the point of the heart.)

1 SC, 1 FPTC, 1 SC, repeat six times with the last FPTC going around the last CH 3 of ROUND 1. Finish the round with CH 2 and a SS through the SS from ROUND 2, which you can now pull tight. Again, keep the new SS loose enough to get the hook through at the end of ROUND 4.
39 ST in total
ROUND 4
Use the same colour as ROUND 1 and tighten the SS from ROUND 2CH 2, 19 SC (1 SC, 1 HDC, 1 SC into the same ST – the point of the heart), 19 SC.Finish the row with CH 2 and a SS through the SS from ROUND 3, which you can now pull tight. Keep the new SS loose enough to get the hook through it at the end of the round.
41 ST in total

ROUND 5
Same colour as ROUND 4
CH 3, 20 HDC, (1 HDC, 1 DC, 1 HDC into the same ST -the point of the heart), 20 HDC, CH 4, finish the heart off by cutting the yarn and turning the last CH into a knot.
43 ST in total


Use a needle to thread the yarn end through the SS from ROUND 4.

ROUND 6
This is the slightly tricky bit.
Using the same colour as ROUND 2 keep the yarn behind the work and insert the hook into the SS from ROUND 4 (you might need to use a smaller hook for this. I use a 2mm)


Change back to the correct size hook
CH 1 by inserting the hook between the CH 2 from ROUND 4 and CH 3 from ROUND 5
Insert the hook between the posts of the fist and second HDC of ROUND 5. YO and draw the yarn through the loop on the hook.

You just made a SS around the post of the HDC. Continue with SS to the end of ROUND 5 (43 ST), CH 1
Take up the smaller hook again and insert it into the same SS you started the round with. Make sure the loop on the hook is as big as the other ST in the round. (You may notice that the knotted chain from ROUND 5 is a bit loose, don’t worry, you’ll pul lthis tight when sewing in the ends.)

Thread onto a needle and insert the needle into CH 1 of ROUND 6.

Turn the heart over and sew in the ends, starting at ROUND 1.

Make sure you pull the yarn tight enough so the SSs are invisible (be careful not to over tighten though!)

Looks quite nice from the wrong side too.
Don’t forget to block your creation, it really does improve the look of it.
Here’s how I do it.

Here’s the diagram. Please make sure you’ve read the tutorial first though, or Round 3 and ROUND 6 will be very confusing.

You can use this heart for many different things, such as a garland, like I did,

or cute little Valentine’s Day decorations, even key chain decorations (although you might want to sew the crochet heart onto a piece of felt/fabric to make it more sturdy.
Be creative!
And please send me photos of your completed hearts so I can share them with everyone in a future post.
Or if you’re on INSTAGRAM you can tag the photo #loveabagfullofcrochet and @stephaniedavies
Here’s the tutorial in PDF form, if you don’t want to read it on-line: OVERLAY HEART


Comments